Integration Summary
Our integration with Pershing allows draft accounts in Pershing systems to be opened directly from within Practifi. Integration initiates the opening of the draft account, which must be reviewed and concluded in the Pershing’s NetX360 Advisor Portal, after formalities with the end-client (review and signing of documents, completion of necessary details required for the account) are concluded. The integration informs the Practifi Advisor the status of the account opening (as either in Draft, or Opened status).
In this implementation:
- Contact information is passed into Pershing to open a Draft Account
- Practifi monitors the status of the Draft Account process and shows its status (In Draft, or Opened) and the Account Type.
Before You Begin
Limitations of this integration (Clients to read)
Before turning on this integration, please carefully assess the following limitations:
-
This Integration will NOT be able to open full accounts end to end. Only draft accounts can be opened in Practifi then the advisors must log into Pershing NetX360 to complete the account opening.
-
This integration cannot open more than one account in the same transaction. For instance, it cannot support opening multiple accounts for the same household in one go.
What Practifi Clients need to do
The Practifi customer (advisor firm) must engage with their Pershing Account Executive, informing them that they wish to integrate their Practifi system with Pershing. In particular, the customer needs to request to authorize the Open and update accounts APIs to be accessed by Practifi on their behalf.
What Practifi will do on clients behalf
The following certificate signing process needs to be completed by Practifi Customer Support on behalf of each customer:
-
Generate a Certificate Signing Request (CSR) outside of Salesforce: use OpenSSL to generate a private key and CSR, to meet the Subject Alternative Name (SAN) requirement.
-
Email the CSR to Pershing to get signed.
-
Pershing will review the CSR and if approved, Pershing will email back a signed certificate.
-
Upload the signed certificate into Salesforce: The signed certificate (.cer file) from Pershing has to be combined with the Private key from step 1 to create the jsk file to upload into the client's Salesforce org.
- Separately, a PLINK ID will be issued and emailed by Pershing to Practifi for this customer's advisor firm. Please note that a PLINK ID is issued per firm for the shared API entitlements across that firm.
- Repeat this process twice: at first for the Pershing QA Environment; then repeat for the Pershing Production Environment once testing completed.
To complete the configuration, the customer must supply (as issued by Pershing) to Practifi the following details for their firm:
- correspondentNumber - Firm (introducing broker-dealer or IBD) number
-
officeNumber - Office number (there could be multiple office numbers per firm)
-
rrCode - Advisor (investment professional, IP or registered representative) number
Contact Field Mapping
Pershing Contact Information
The following information is passed in one block to Pershing for the opening of a Draft Account:
- Primary Account Holder [from Contact, must be one]
- Additional Account Holders [from Contact, none to many]
- Address(es) of Primary Account Holder [from Account, none to two]
- Address(es) of each Additional Account Holders [from Account, none to two]
- Phone number(s) of Primary Account Holder [from Contact, none to all of Work, Home, Mobile]
- Phone Number(s) of each Additional Account Holders [from Contact, none to all of Work, Home, Mobile]
Mapping
The following table shows the mapping of Practifi UI fields to Pershing.
|
Practifi UI field |
From |
Direction |
Pershing Form field |
Note |
|
First Name |
Contact |
🠞 |
First Name |
For the Primary Account Holder |
|
Last Name |
Contact |
🠞 |
Last Name |
For the Primary Account Holder |
|
Postal Street |
Account |
🠞 |
Address Line 1 (Account) |
For the Primary Account Holder |
|
Postal City |
Account |
🠞 |
City (Mailing) |
For the Primary Account Holder |
|
Postal Postcode |
Account |
🠞 |
ZIP/Postal Code (Mailing) |
For the Primary Account Holder |
|
Postal State |
Account |
🠞 |
State/Province (Mailing) |
For the Primary Account Holder |
|
Postal Country |
Account |
🠞 |
Country (Mailing) |
For the Primary Account Holder |
|
Location Street |
Account |
🠞 |
Address Line 1 (Legal) |
For the Primary Account Holder |
|
Location City |
Account |
🠞 |
City (Legal) |
For the Primary Account Holder |
|
Location Postcode |
Account |
🠞 |
ZIP/Postal Code (Legal) |
For the Primary Account Holder |
|
Location State |
Account |
🠞 |
State/Province (Legal) |
For the Primary Account Holder. If Country is CA or US, 2 letters required |
|
Location Country |
Account |
🠞 |
Country (Legal) |
For the Primary Account Holder. Hard coded to US presently. |
|
Gender |
Contact |
🠞 |
Gender |
For the Primary Account Holder |
|
First Name |
Contact |
🠞 |
First Name |
For each Additional Account Holder |
|
Last Name |
Contact |
🠞 |
Last Name |
For each Additional Account Holder |
|
Postal Street |
Account |
🠞 |
Address Line 1 (Mailing) |
For each Additional Account Holder |
|
Postal City |
Account |
🠞 |
City (Mailing) |
For each Additional Account Holder |
|
Postal Postcode |
Account |
🠞 |
ZIP/Postal Code (Mailing) |
For each Additional Account Holder |
|
Postal State |
Account |
🠞 |
State/Province (Mailing) |
For each Additional Account Holder |
|
Postal Country |
Account |
🠞 |
Country (Mailing) |
For each Additional Account Holder |
|
Location Street |
Account |
🠞 |
Address Line 1 (Legal) |
For each Additional Account Holder |
|
Location City |
Account |
🠞 |
City (Legal) |
For each Additional Account Holder |
|
Location Postcode |
Account |
🠞 |
ZIP/Postal Code (Legal) |
For each Additional Account Holder |
|
Location State |
Account |
🠞 |
State/Province (Legal) |
For each Additional Account Holder. If Country is CA or US, 2 letters required |
|
Location Country |
Account |
🠞 |
Country (Legal) |
For each Additional Account Holder. Hard coded to US presently. |
|
Gender |
Contact |
🠞 |
Gender |
For each Additional Account Holder |
|
Home |
Contact |
🠞 |
Home |
For each Primary and Additional Account Holders, up to three for each. |
|
Mobile |
Contact |
🠞 |
Cell |
For each Primary and Additional Account Holders, up to three for each. |
|
Work |
Contact |
🠞 |
Work |
For each Primary and Additional Account Holders, up to three for each. |
Enabling the Integration
Enabling the Constant Contact integration with Practifi requires setting up the following configurations:
|
Configuration |
Where |
|
Upload Authentication Certificate |
Salesforce Settings |
|
Create Named Credential |
Salesforce Settings |
|
Create Remote Site |
Salesforce Settings |
|
Apply Pershing Division Advisor and Information |
Salesforce Settings |
|
Enable the Integration |
Salesforce Settings |
|
Schedule Sync Jobs |
Salesforce Settings |
|
Add Picklist Item |
Salesforce Settings |
|
Activate Menu Items |
Practifi Menu Items |
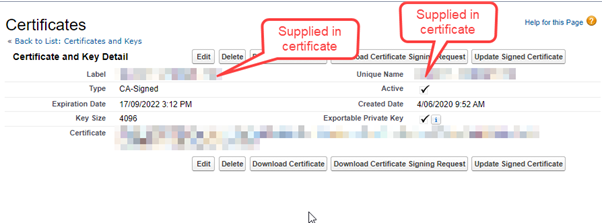
Upload Authentication Certificate
One certificate needs to be uploaded:
- <name and location is TBA>
Go to Salesforce Setup under the user’s avatar/picture icon in the top right

In Salesforce Setup, go to the Quick Find/Search bar, search for and click on Certificate and Key Management
Click on Import from Keystore

Select the
- <name TBA>
- Password for the Keystore
The Keystore file for production access to the Pershing system for the customer will have already been received by Practifi for installation (see Before You Begin, above). Its details, including the password, are held in bitbucket. Click Save.
Create Named Credential
In Salesforce Setup, go to the Quick Find/Search bar, search for and click on Named Credentials
Click on New Named Credential


Supply the following:
- Label: Suggest Pershing_ Prod
- Name: <accept default>
- URL: <Production URL TBA>
- Identity Type: Named Principal
- Authentication Protocol: Password Authentication
- Username: <Production credential TBA>
- Password: <Production credential TBA>
- Generate author header: Ticked
Create Remote Sites
The Pershing Remote Site reference is set up individually within each Client Org.
In Salesforce Setup, go to the Quick Find/Search bar, search for and click on Remote Site
Click on New Remote Site


Supply the following:
- Remote Site Name: Suggest Pershing_Prod
- Remote Site URL:<Production URL TBA>
Click Save.
Apply Advisor's rrCode Information
User Level
Every Advisor will be allocated by Pershing an "rrCode", which is included as part of the draft account set up process. This value is added on the Edit Team Member panel.
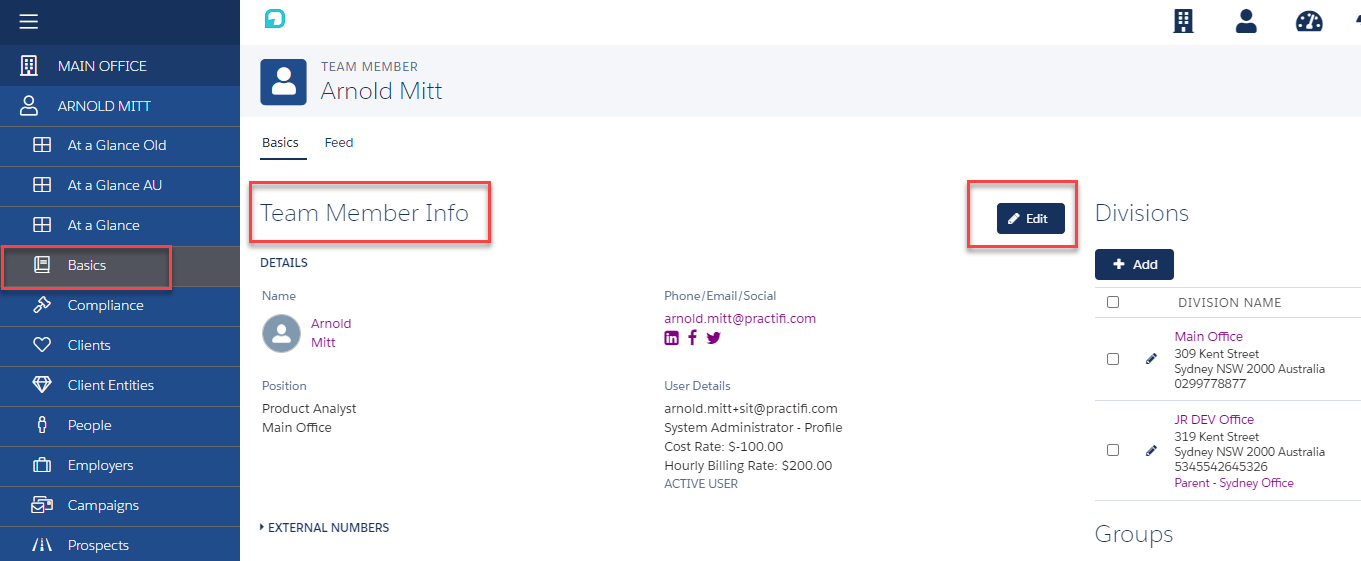
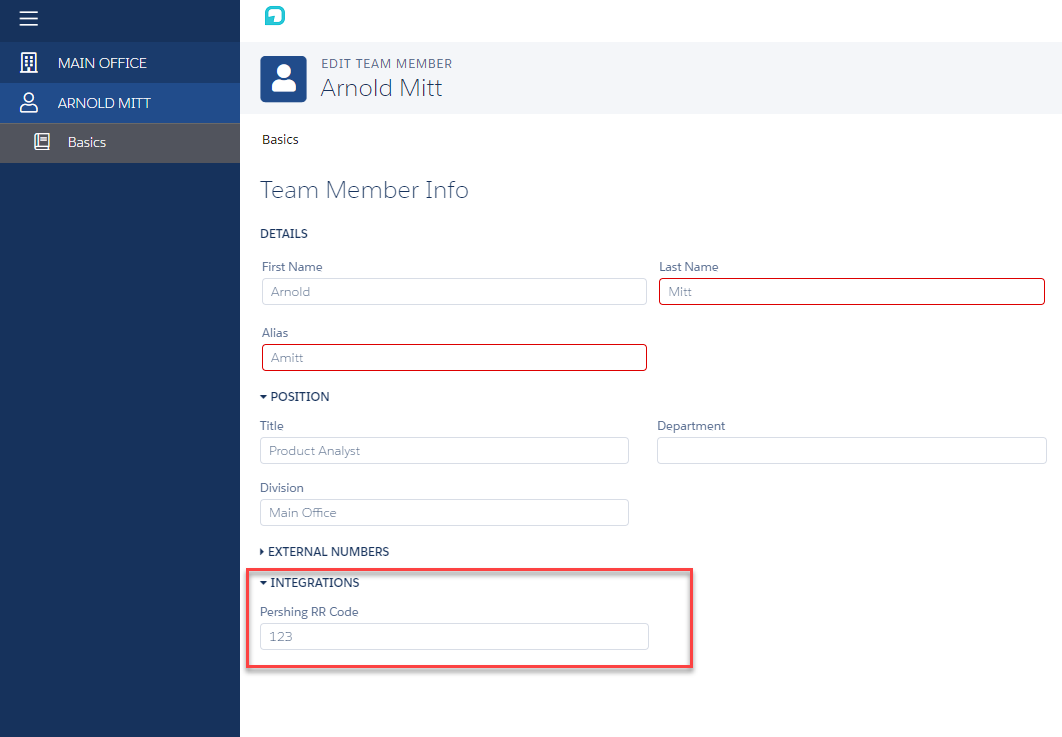
Click Save at the bottom right. Each Advisor can apply this update to their own profiles.
In the event this value is not set, or is not valid, when the Advisor tries to create a Pershing account the following message will appear:

Enabling the Integration
Another set of data required relates to some defaults for opening a Draft Account. These are set in a Custom Object.
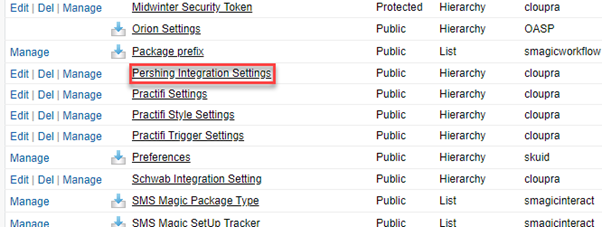
Click Manage, then Edit.
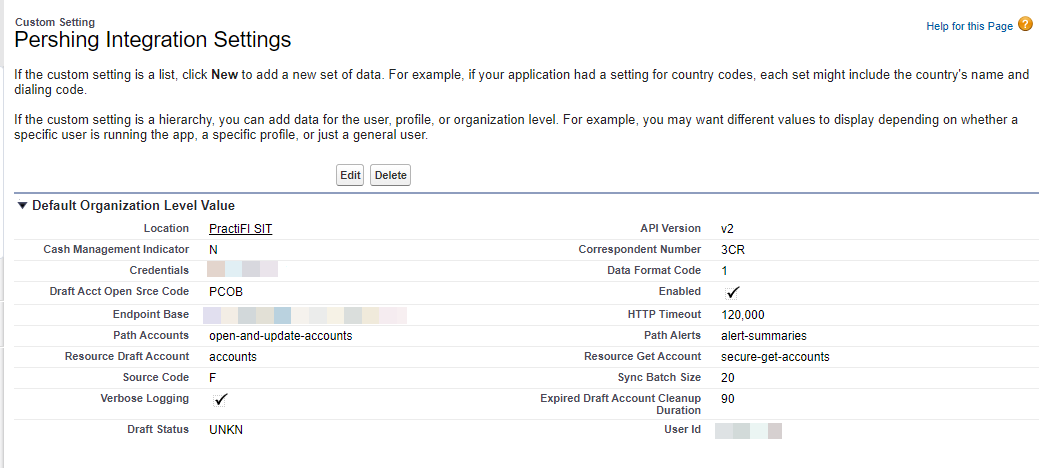
Complete the following:
- API Version: v2
- Cash Management Indicator: N, Issued by Pershing for the firm
- Correspondent Number: 3CR, Issued by Pershing for the firm
- Credentials: The Name of the Named Credential (created earlier)
- Date Format Code: 1
- Draft Acct Open Srce Code: PCOB
- Enabled: Ticked
- Endpoint Base: <Production URL TBA>
- HTTP Timeout: 120000
- Path Accounts: open-and-update-accounts
- Path Alerts: alert-summaries
- Resource Draft Account: accounts
- Resource Get Account: secure-get-accounts
- Source Code: F
- Synch Batch Size: 20
- Verbose Logging: Ticked
- Expired Draft Account Cleanup Duration*: 90 (days)
- Draft Status: UNKN
- User Id: <the PLINK supplied by Pershing>
Expired Draft Account Cleanup Duration*. If a Draft Account request has been left as draft for this number of days, it will be deleted from the Pershing Accounts list of Accounts. This matches Pershing’s timelimits for the conversion of a Draft Account to a Full Account.
Schedule Synch Jobs
Go to the Quick Find/Search bar, search for and click on Apex Classes
Click on Schedule Apex
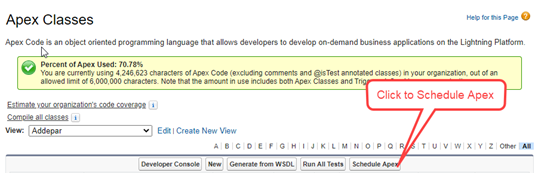
Look up Pershing_ScheduleSync and select as the Apex Class. Apply the required schedule, bearing in mind the end-of-day completion jobs on the Pershing system.
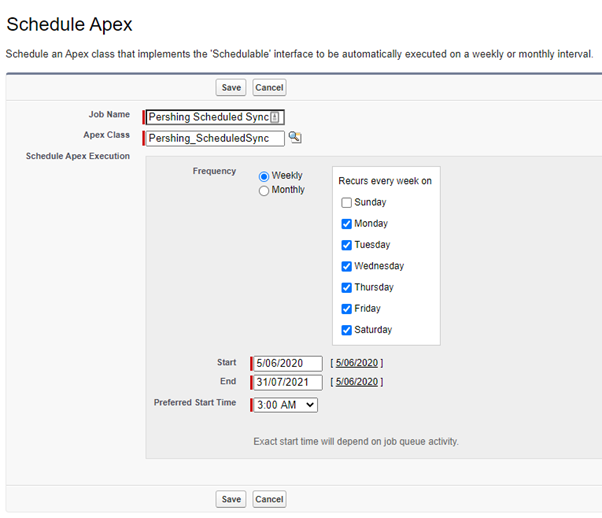
Click Save
Add Pershing OfficeNumbers
Add the list of Office Numbers (assigned to the Advisor firm by Pershing) to the list in Categories.
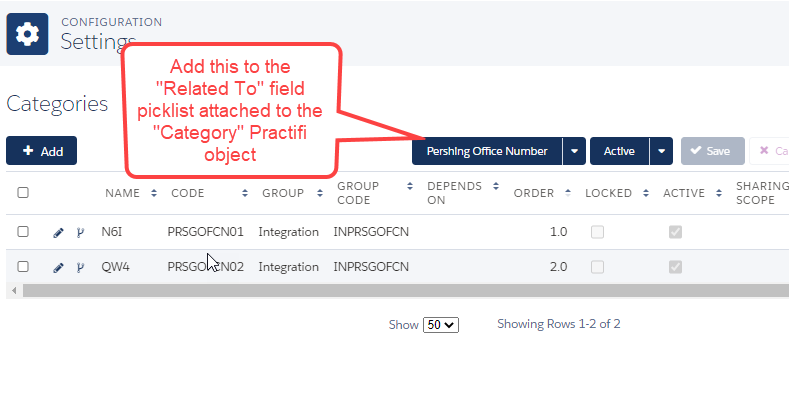
- In SF, Add another entry to "Related To" picklist, to add another item as "Pershing Office Numbers"
- Under Settings > Categories, filter to Pershing Office Numbers
- Add Codes for N6I etc, as supplied by Pershing for the Advisor firm. Use the Group Code of INPRSGOFCN. The Code can be by anyother name, as long as unique.
- The order of the Office Number items is determined by the Order field.
Add Picklist Item
Go to the Quick Find/Search bar, search for and click on Picklist Value Sets
Click on Menu Item Tabs (not Edit)
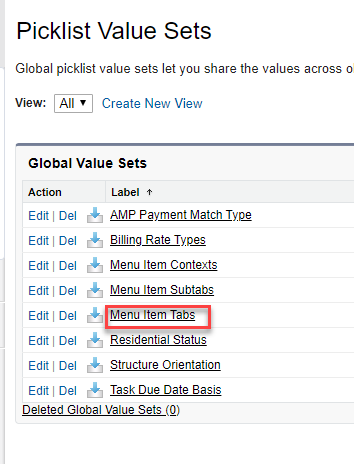
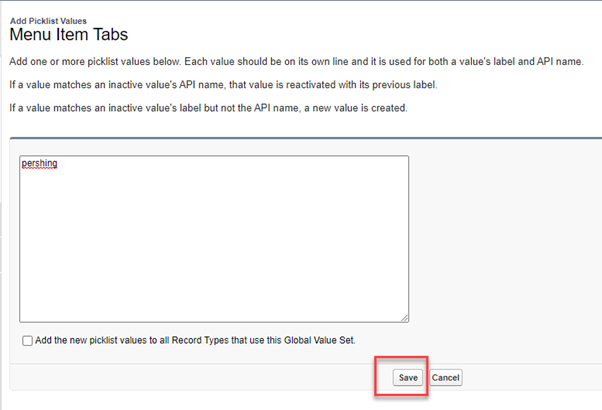
Check if the word pershing is not there. If not, click on New
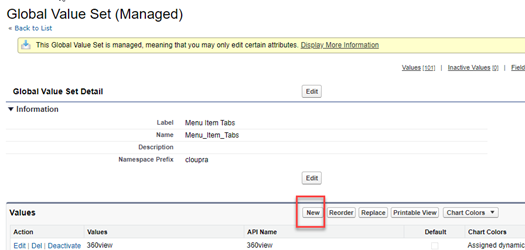
Add the word pershing, lower case, to the field, and click Save
Enabling Menu Items
Pershing Accounts
Pershing Accounts appear under the Data Management tab.
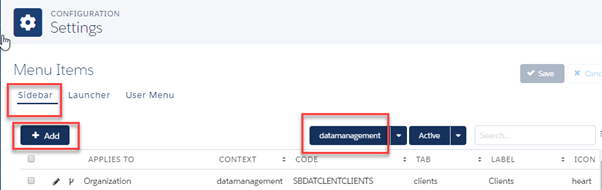
Complete the new row as follows
- Applies to: Organization
- Context: datamanagement
- Code: SBDATAPRSHNG
- Tab: pershing
- Label: Pershing Accounts
- Icon: rss
- Order: 13.00 (TBA)
- Display Options: Pages
- Sidebar?: Ticked
- Default: Unticked
- Active: Ticked

Comments
Please sign in to leave a comment.