Please note: This article reflects a previous version of the Envestnet Tamarac integration. Updated documentation is currently in development and will be published when available. For questions in the meantime, please reach out to your Client Success Manager or Practifi Support.
Please note: This content is intended for Practifi System Administrators and is technical. The steps described in this article may not be completed without System Administrator permissions. Please discuss your integration installation plans with your Practifi Customer Support Team for their assistance.
Overview
The Envestnet Tamarac integration keeps your firm's information within your Tamarac instance in sync with your records within Practifi, so your team can rely on consistent client information across both systems without maintaining the same data in two places. This article outlines the steps to enable the Envestnet Tamarac integration within your organization. For more information about this integration, please consult our Using the Envestnet Tamarac Integration article.
- Integration Summary
- Single Sign-On (SSO) Limitation
- Installation
Integration Summary
Our integration with Tamarac keeps your Practifi Client, People, and Asset records in sync with Tamarac's Households, Clients, and Accounts, and it provides deep links from Practifi directly into Tamarac records, so your team can move between systems without losing context. The information flow between systems functions as follows:
| Practifi | Sync Frequency and Direction | Tamarac |
| Client | < Real-time > | Household |
| People | < Real-time > | Client |
| Asset | < Manual | Account |
As part of the integration enablement process, Practifi Support will need to create a workflow to update the Asset Category, Source, and Under Advice fields for Tamarac assets.
Single Sign-On (SSO) Limitation
The Tamarac Salesforce app allows users to send and view a linked Household in the Tamarac Reporting portal from within Practifi, using the Create in Tamarac and Open in Tamarac links, keeping advisors close to the records they need without switching systems. However, this feature is only accessible to a user login that meets the following two criteria:
- Must have an Enterprise Administrator account in Tamarac and
- Must be a Practifi user with the System Administrator Profile and the Customize Application permission assigned.
If meeting the above requirements leads to compliance issues, a client firm should deactivate this SSO feature by removing the Create in Tamarac and Open in Tamarac buttons. To view a Practifi client in Tamarac, users should open a separate browser tab and log in directly to their Tamarac account.
Please note: Password changes made to the user who authenticated the integration will cause issues within the integration. If the password was changed in Practifi or Tamarac, then the integration must be reconfigured. Please consult the Reconfiguring After Password Change section for the steps to reconfigure.
Installation
Please note: Enabling the Tamarac integration is somewhat technical. If you have any difficulties, please get in touch with your Customer Success Manager to help get you up and running.
Install the Tamarac Package
Set Up My Domain
- From Practifi, click the Setup icon in the top-right corner and select Setup from the drop-down menu.
- In the Quick Find search bar, search for and click My Domain.
- Under Choose Your Domain Name, enter your desired domain name and click Check Availability.
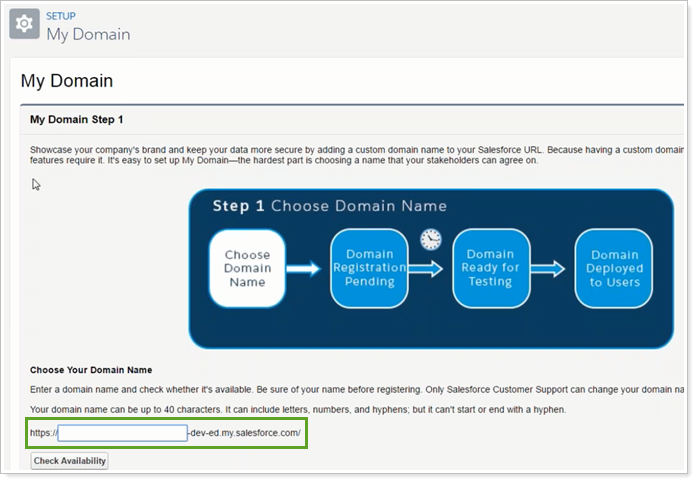
- When you have a domain name, click Register the Domain. Once registration is complete, you will receive an email that says your domain is ready for testing.
- Copy the complete URL of your domain; you'll provide this to Tamarac in the next step.
Create a Self-Signed Certificate
Tamarac advises that creating and sending this certificate to them is a one-off exercise, and the expiry date is unimportant. It does not need to be renewed upon expiry.
- From Salesforce Setup, use the Quick Find search bar to search for and click Certificate and Key Management.
- Click the Create Self-Signed Certificate button in the Certificates section.
- Give the certificate a Name and then click out of the text box. The Unique Name field should automatically populate.
- Then click Save to be taken back to the Certificates page, where you'll see the one you just created.
- Click the Certificate Name to be taken to a page where you can download a copy.
- Change the file extension of the downloaded certificate from .crt to .txt.
Send Information to Tamarac
You'll need to provide the following information to the Tamarac Service Team:
- The domain URL you created above
- The certificate file you downloaded above
- The Salesforce.com Organization ID for your Practifi instance. This is found on the Company Information page in Salesforce Setup.
Install the Application
- In your web browser, enter the URL received from the Tamarac Account Management team.
- Click the Get It Now button.
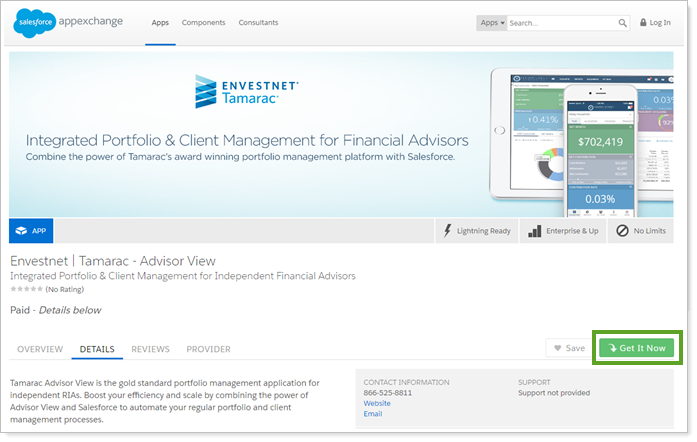
- Log in to the Salesforce AppExchange using your Practifi login.
- Click Install in Production.
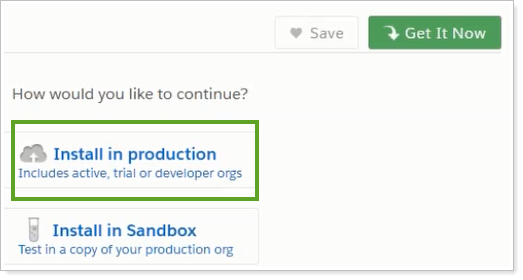
- Click Agree, then click Confirm & Install.
- Log in to Practifi. You must use an administrator login for this step.
- Under Install Tamarac Advisor View, select Install for All Users and click Install.
Below is the link to install the Tamarac Advisor View version 1.81.
https://login.salesforce.com/packaging/installPackage.apexp?p0=04t41000002Ih3E-
Please note: Tamarac Advisor View version 1.81 includes an important fix that ensures reliable integration with Salesforce. Without it, an error similar to the one below will be encountered when using the integration. If the wrong version (1.80) of the Tamarac app is installed, please follow the URL above to upgrade the app. There is no need to uninstall the previous version.
-
- In the Approve Third-Party Access window, select Yes, grant access to these third-party websites, and click Continue. The app will install.
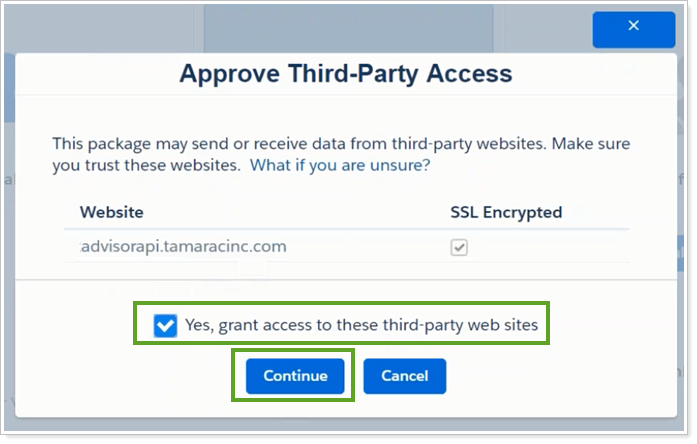
- Click Done on the Installation Complete page when the app has been installed.
Configure Salesforce Settings
Remote Site Settings
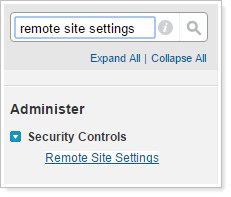
- In the Quick Find search bar in Salesforce Setup, search for and click Remote Site Settings.
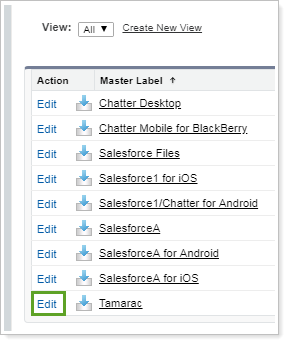
- Under All Remote Sites, click Edit under the Action column.
- Under Remote Site Edit, provide the following information:
- Remote Site Name - Leave as the default value.
- Remote Site URL - https://advisorapi.tamaracinc.com
-
Description - Optional
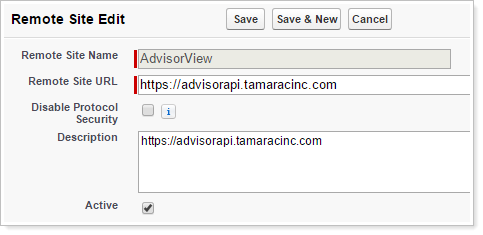
- Click Save to finalize this change.
Connected App and Permission Settings
- In the Quick Find search bar in Salesforce Setup, search for and click Identity Provider.
- Click Enable Identity Provider.
- Select the self-signed certificate you created earlier, then click Save.
- In the Quick Find search bar in Salesforce Setup, search for and click Manage Connected Apps.
- Click the Edit link for the Tamarac connected app.
- Under SAML Service Provider Settings, complete the following fields:
- Entity Id - https://portal.tamaracinc.com
- ACS URL - https://integrationservices.tamaracinc.com/genericsso.aspx
- Subject Type - Select User ID
- Name ID Format - Leave as the default value.
- Issuer - Enter the Salesforce domain URL you created previously.
-
Idp Certificate - Select the self-signed certificate you created previously.

- Click Save, and you'll return to the Connected Apps page.
- Click on the Tamarac app's name to be taken to the Manage Connected Apps page. Look for SAML Login Information and copy the IdP-Initiated Login URL. You will need this later to set up the custom metadata.
- Set which Salesforce profiles should have SSO access from Salesforce to Tamarac:
- On the Manage Connected Apps page, look for Profiles.
- Click Manage Profiles.
- Select all Practifi user profiles, along with System Administrator, then click Save.
- Ensure Custom Setting Permissions for the Profile the Users are assigned to are enabled for Tamarac.
- Note the Profile Name(s) of the Users requiring access to Tamarac.
- In the Quick Find search bar in Salesforce Setup, search for and click Users.
- Locate the Profiles section.
- From the list of Profiles, choose the required Profile name. For example, the System Administrator profile.
- From the Profiles panel, skip to the Enabled Custom Setting Definitions Access section by clicking its sublink.
- Click Edit on the Enabled Custom Setting Definitions Access section.
- Ensure the Tamarac.TamAdvisor.Tamarac.<etc> Custom Setting Definitions are listed in the Enabled column, and click Save.
Configure Custom Metadata Type
- In the Quick Find search bar in Salesforce Setup, search for and click Custom Metadata Types.

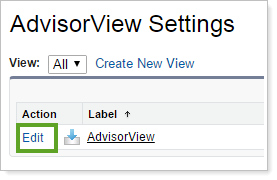
- Under All Custom Metadata Types, click Advisors View Setting under the Label column.

- Under Custom Metadata Type Detail, click Manage Advisor View Settings.

- Under Advisor View Settings, click Edit.
- Provide the following information:
- Enterprise ID - This is your Tamarac Enterprise ID. Contact the Tamarac Service Team if you need assistance finding your Enterprise ID.
- Local IdP Initiated Login URL - Copy and paste the IdP-initiated Login URL from the Connected App.
-
Override Base URL- Copy the base URL from the Base URL field to the left and add /api to the URL.
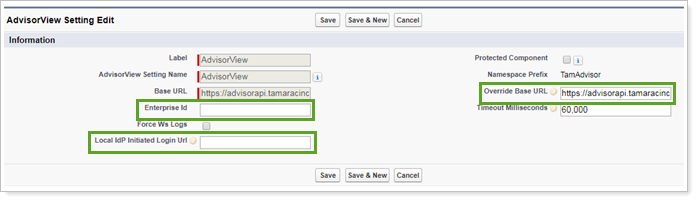
- Click Save to finalize this change.
- Practifi Support must create a workflow to update the Tamarac assets' Asset Category, Source, and Under Advice fields.
Enable SSO Authentication
As outlined above, the Tamarac Salesforce app enables users to send and view a linked Household in the Tamarac Reporting portal from within Practifi. However, this feature is only accessible to a user login that meets the following two criteria:
- Must have an Enterprise Administrator account in Tamarac and
- Must be a Practifi user with a System Administrator Profile and the Customize Application permission assigned.
If meeting the above requirements would lead to compliance and security issues for the firm, the client firm should not activate this SSO feature or install the Tamarac links. To view a Practifi client in Tamarac, users should open a separate browser tab, log in directly to their Tamarac account, and search for the client.
If you wish to proceed:
- Notify the Tamarac Service Team that your Practifi instance is ready for SSO integration. The team will configure their systems to allow SSO.
- When they inform you that the SSO integration is complete, log in to Practifi and navigate to Salesforce Setup.
- Click the Tamarac app from the App Launcher in the upper left-hand corner.
- Click the Configuration tab.
- To authenticate the Tamarac Reporting credentials for Salesforce, enter your Tamarac Reporting credentials in the first section. These credentials must be for an Enterprise Administrator, and they must have the following settings in Tamarac:
- After entering the Tamarac Reporting credentials for the user, click Save.
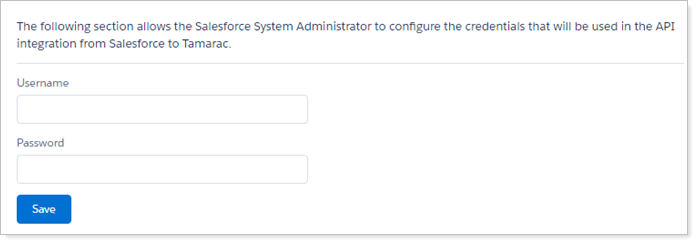
- To authenticate the Salesforce Credentials for Tamarac Reporting, the credentials must be for a user with the System Administrator profile and the Customize Application permission assigned. They must be the same user in Tamarac.
-
In the Salesforce OAuth Settings section of Tamarac, click Change Salesforce Login, enter your Salesforce credentials, and click Allow.

Please note: Password changes made to the user who authenticated the integration will cause issues within the integration. If the password was changed in Practifi or Tamarac, then the integration must be reconfigured. Please consult the Reconfiguring After Password Change section for the steps to reconfigure.
Map Asset Fields
The Tamarac package is configured to suit the Salesforce data model by default. However, out of the box, Practifi supports only a subset of the fields offered by the Tamarac App. Any additional mapping will require custom fields and might not be supported per our standard support arrangement.
Verify the following values under the Manage Mappings subtab.
- Click the Manage Mappings tab on the Tamarac app, and click Edit on the rows listed.
-
For the Client - Contact row, validate 7 fields only OTTB:
- Tamarac Entity - Client
- Salesforce Object - Contact
- For the Client Fields:
- CRM Id - Contact ID
- Email - Email
- First Name - First Name
- Household CRM Id - Primary Entity
- Last Name - Last Name
- Tamarac Id - Tamarac Advisor View ID
- Updated by Tamarac Integration - Updated by Tamarac Integration
-
For the Event - Task row, validate 1 field only OTTB:
- Tamarac Entity - Event
- Salesforce Object -Task
- For the Event fields:
- Is Active - Checked
- Client Email Address Changes - Checked
- Client Household Membership Changed - Checked
-
For the Household - Entity row, validate 13 fields only OTTB:
- Tamarac Entity - Household
- Salesforce Object - Entity
- For the Household Fields:
- CRM Id - Entity ID
- City - Billing City
- Managed Value - Managed Value
- Management Fee - Mgmt Fee
- Name - Entity Name
- State - Billing State/Province
- State of Primary Residence - State of Primary Residence
- Street - Billing Street
- Tamarac Id -Tamarac Advisor View Id
- Total Value - Total Value
- Unmanaged Value - Unmanaged Value
- Updated by Tamarac Integration - Updated by Tamarac Integration
- Zip - Billing Zip/Postal Code
Adjust Field Mapping
To see Tamarac Assets (Financial Accounts) in Practifi, you need to adjust the field mapping to match what Practifi uses.
- Click Del next to Financial Account and confirm the deletion in the pop-up window.
- Click the New Mapping button in the top-right corner to access the Configure Object Mapping page.
- Complete the new mapping as follows:
- In the dropdown header, select the following objects:
- Tamarac Entity - Financial Account
- Salesforce Object - Asset/Liability
- For the Financial Account Fields, validate 9 fields only OTTB:
- Account Name - Asset/Liability Name
- Account Number - Account Number
- Account Type - Notes
- CRM Id - Record ID
- Managed Value - Current Value
- Household CRM Id - Client
- Tamarac Id - External Id 4
- Total Value - Value
- Updated by Tamarac Integration - Updated by Tamarac Integration
- In the dropdown header, select the following objects:
- Click the Save button.
- Click the Send Mappings button to transfer the mappings to the Tamarac server.
Add Links to Practifi Client Record
The Tamarac integration appears as two links in the Actions menu on the Practifi Client record, giving advisors a one-click path between a client's Practifi record and their Tamarac Household.
- While on the Client Record page, click the Setup icon in the top-right corner and select Edit Page from the drop-down menu.
-
Click on the section displaying the Client's name under the icons.
-
On the right-hand column, in the Page > Highlights Panel section, click the Add Action button and click the search bar located under Actions.
-
Search for Create in Tamarac and select this option from the drop-down menu.
- Click Done when selected.
-
Repeat the steps searching for Open in Tamarac, and click Done.
- Click Save to finalize these additions.
-
Return to the Client Record page using the back arrow in the top-left corner.
-
The new links for Tamarac appear under the dropdown arrow in the record side panel. You may need to refresh your browser to see this change.
Troubleshooting
Connection to Tamarac Failure
If you don't see a response when you click the Tamarac buttons, there may be an issue with your Salesforce login or the connection to the Tamarac system. To troubleshoot this error, please follow these steps:
- Open an incognito tab on the browser. This is necessary because the Salesforce credential information for the non-working credentials is retained in the browser.
- Open the Tamarac portal using https://portal.tamaracinc.com/salesforcesettingdetails.aspx and log in to the Tamarac portal using your Tamarac credentials, not your Salesforce credentials.
- Click the Change Salesforce Login button on the top right.
- A Salesforce login panel will appear. Enter the credentials of the Salesforce user who should be enrolled against the Tamarac account.
Reconfiguring After Password Change
Password changes made to the user who authenticated the integration will cause issues within the integration. If the password was changed in either Practifi or Tamarac, then the integration needs to be reconfigured using the following steps.
In Practifi:
Sign in to Practifi and navigate to the Tamarac App's Configuration Page.
In the top section, re-enter the Email and Password for Tamarac Reporting in the available boxes, then click Save.
Once these steps are completed, sign out of Practifi.
In Tamarac:
Sign in to Tamarac.
In the Browser search bar, enter the following URL: https://portal.tamaracinc.com/salesforcesettingdetails.aspx
On this page, click the Change Salesforce Login button on the right.
A Salesforce login page will pop up. Enter the Practifi credentials and click Save.
You may see another pop-up asking you to allow Tamarac to access Salesforce via the API. Click Allow.
Next, sign back into Practifi and head to the Tamarac Manage Mapping page. Click the Send Mapping button.
Comments
Article is closed for comments.